Lesson Title:
Pigments,
Paint and Prehistory (when it all began)
Author: Lucy Andrus
Grade/Age Level: Elementary and Early Middle School
Written here for: School #68, 3rd grade
Conceptual Basis For This Lesson:
Unit/Theme, Relation of Lesson to the Unit, Major Concepts to be Learned:
This session in our unit, The Language of Art, begins
to address the students stated desire to learn to draw. It precedes the introduction
of the basic art elements and principles as the foundation for visual language
and the development of drawing skills. The students will be introduced to
the world of pigments, paint and prehistoric people who expressed themselves
visually, beginning with a look at prehistoric cave images and other earlier
artistic methods (Australian Aboriginal and Native North American rock pictographs
and petroglyphs). The students will learn about humankinds natural, biological
urge (Dissanayake) to create visual images and objects and to tell their
stories, and that such human behavior is universal and predates recorded
history. The students will understand how and why humans first began to record
important activities of daily life through drawing and painting.
Relation to Life:
Learning
Standards
Goals Specific
to Lesson/Unit (reflecting NYS standards, & targeted learning areas. See
Abbreviation Key at end):
1. Increase awareness and appreciation
for human aesthetic expression across time and cultures AE, Std. 3,
4
2. Develop awareness and appreciation for natural objects as art tools and
materials AP, Std. 2
3. Understand concepts of science in creating pigment from rock, clay and
berries (approximation, measuring, mixing, solid to liquid) AP, Std.
2, A/C
4. Understand visual expression as a form of narrative AC, AH, Std.
3
5. Increase understanding and skill in the use of line in drawing AP,
Std 1
6. Develop sense of competency through effective use of art tools, materials
and processes S/E, AP, Std. 2
7. Increase descriptive language skills A/C, C, Std. 3
8. Develop group cooperation and sharing skills S/E
9. Experience and embrace the role of maker and consumer of art AH,
AE, AP, AC, Std. 1, 2, 3, 4
Performance Objectives for Observational Assessment (reflecting goals):
The students will be able to:
Opening:
- Recall/define the three As (what Art Partners teaches about) Goal 9
- Recall/define the three Cs (behaviors to learn and use) Goals 8, 9
- Name at last one artmaker behavior Goal 9
- Name one reason why early humans made pictures Goals 1, 4
- Name/describe one way to make pigment (crush rocks, clay, berries) Goals 2, 3
- Define the term pigment correctly (color) Goals 3, 7
- Describe one way to make a painting tool from natural materials Goals 2, 6
Middle:
- Participate in group painting by contributing at least one hand or finger mark, and using at least two different tools to add additional marks Goals 5, 8, 9
- Describe one idea (the story)
contained in their drawn and painted expressions Goals 4, 7
Closing:
- Recall the meaning of the term pigment correctly Goals 3, 7
- Recall the Three As Goals 1, 9
- Offer one descriptive response to the group paintings Goals 1, 7
Tools Needed For Application
Vocabulary (defined in age-appropriate, student-friendly terms):
Visuals:
- Teacher-made:
- Visual Resources:
Materials and Preparation: NOTE: S/T = Student Teacher
- S/Ts make natural painting/drawing tools for each child (sharpened sticks, short hair and/or grasses tied to sticks, brushes made from smashing one end of a fibrous plant stem, feathers)
- S/Ts gather pigment rocks (dried clay, bits of old brick, small rocks that leave a mark)
- Gather berries for crushing and making inks (wild pokeberry especially good)
- 8 rock mortar and pestle sets one for each S/T (1 larger flat and 1 smaller round)
- S/Ts make 1 prepared paper for their group (brown grocery bad is soaked in water, wrinkled and crinkled, lay flat to dry, iron, then tear into organic shape)
- Display of natural objects to fashion tools from (grasses, feathers, hair, sticks)
- Smocks
- Paper to cover tables
- Masking tape
- Black marker and display board
- Shallow cups for ground pigments and crushed berries, with sticks to stir
- Water, oil and/or egg yolk with fork and dish (mixed with powdered pigment to bind)
- Brown, white and red tempera to enhance pigments
- White, black, ochre chalk/charcoal
- Sponge, buckets, towels
- Goggles, if available
Application
Procedural Steps: (details on procedures from beginning to end with ability-appropriate language scripted in as necessary)
Adaptations: NA
Opening:
Note: Have children put smocks on
1.
2. Teacher recalls/explains what it means to be a maker of art: see, think, care, and behave like artists; realize that art is all around us.
3. Teacher recalls the childrens
wish list of things they want to learn about in Art Partners, and focuses
on their desire to draw and use paint.
4. Teacher focuses on the art medium of painting as a way people can express their ideas, and asks students when they think painting began. Do you think people through time have always painted pictures? When and how did this all start?
5. Leader helps students to go back in time in their thinking, describing what the world and life was like way before modern times, maybe using dinosaurs as a reference since this is something the students will have heard about...what was the world like thousands and thousands of years ago? before history was even written down? Leader can have students explore the fossils to aid in understanding.
Leader explains the term, prehistoric: what was the world like in prehistoric times? Did people make art? Did they make drawings and paintings? How do you think they did this?
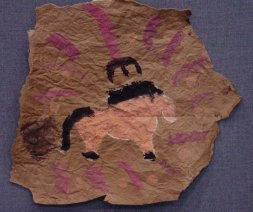
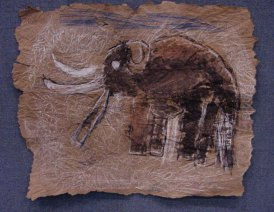
6. Teacher presents/explains cave paintings and other forms of early visual expression using natural pigments, and engages students in a discussion of what, why and how early humans made images... Why do you think the cave painters made these pictures? Why would people make such pictures? (ask if students saw movie Castaway and use as an analogy...the man felt a great need to express or tell about his experiences through pictures). Do you ever doodle? or draw pictures at home? Why do you do this?, etc. Leader makes statement about humans need to express themselves using art.
7.
8. Teacher defines the term, pigment,
and explains/demonstrates making colors or pigments by grinding rocks/clay
and adding water, and crushing berries. Teacher points out the connection
to ideas of science as we must calculate, formulate, measure, and mix.
9. In their small groups S/Ts guide students as they try grinding pigments on the stone mortar and pestle, making sure all have a turn. Children should only grind the brick pieces and the clay (soft) unless all have goggles to wear while grinding rocks. Place ground pigment powder into cups provided (to be used to paint with).
10.Leader
asks students what they think early people might have used to apply their
paints to rocks and caves walls and hide. Where would they get painting and
drawing tools? Could they go to a store and buy them like we do?
11. Leader explains humans dependence
on the natural world, and asks students to imagine what natural materials
you could use to make a paintbrush or other tool to paint and draw with. What
did people have around them out in nature? Plants, animals. Leader may need
to put out a selection of natural objects to help students make the connection:
animal tail hair, pine needles, twigs, feathers.
12. Leader demonstrates how such a tool might be made: crush end of a twig or a plant stem until it splits into splinters; cut animal tail hair and tie to a stick, etc.
13. Leader then briefly demonstrates painting on a rock using the ground pigment (add water and mix) and the tool.
14. What else could art makers use to paint with? Especially if they couldnt
find any tail hair, etc. Their fingers and hands! Leader demonstrates by adding
such a mark to the rock.
Middle:
15.
16.
17. When paintings are complete, all clean up, taking care to preserve
our handmade painting/drawing tools. Use sponge, bucket and towel to wipe
hands clean with S/T supervision and help (S/Ts stay in control of sponge
and water buckets).
18. Hang paintings on board with masking tape.
Closing:
19. After clean-up, all reconvene as large group to view and discuss the paintings. Concepts and terms are reviewed, and stories are told.
20. Leader suggests that we continue our journey of learning to draw, and next time, we will learn about the basic art elements that all artmakers need to know about in order to be good/competent at drawing and painting.
Assessment:
In addition to observation of the Performance Objectives described above, questions to ask might include:
-
Do the images tell a story?
-
Do they exhibit a sense of unity and group cohesion?
-
Do they demonstrate application of concepts taught?
Abbreviation Key
DBAE: |
NYS Standards for the Arts: |
|---|---|
| AH = Art History | Std. 1 = creating, participating in art |
| AC = Art Criticism | Std. 2 = knowing art materials and processes |
| AE = Aesthetics | Std. 3 = responding to works of art/artists |
| AP = Art Production | Std. 4 = knowing cultural dimensions of art |
| Needs Assessment Areas for Developing Skills and Abilities: |
||
|---|---|---|
| A/C = academic/cognitive | M/P = motor/perceptual | E = emotional |
| C = communicative status | W/S = work/study habits | S = social |
| Pre-V = prevocational skills | L = living skills |
|
This is a non-commercial website and is to be used for educational or research purposes only. No commercial use is permitted without the consent of Art Partners. "Fair use" is claimed under U.S. copyright law, sections 107 and 108. For questions contact:Art Partners
©2002 Art Partners Program | All Rights Reserved