Lesson Title:
“What’s My Line?”
Introducing Basic Art Elements
Author: Lucy Andrus
Grade/Age Level: Elementary and Early Middle School
Written here for: School #68, 3rd grade inclusion class
Conceptual Basis For This Lesson:
Unit/Theme, Relation of Lesson to the Unit, Major Concepts to be Learned:
This
lesson continues our unit, The Language of Art, which includes lessons on
the basic art elements and principles, developing drawing skills (response
to the children’s stated wish), and narrative in art. This lesson will
focus on an introduction to the visual alphabet, beginning with the element
of line: its definition, its qualities, and its use in art and design.
The children will participate in various exercises for understanding basic
elements of line and shape, followed by an activity exploring line, shape,
and space in a non-objective two dimensional design. The students will build
on this knowledge to increase their visual acuity and sharpen their ability
to see and capture line and shape in rendering objects in subsequent lessons.
Relation to Life:
Learning
Standards
Goals Specific
to Lesson/Unit (reflecting NYS standards, & targeted learning areas. See
Abbreviation Key at end):
1. Increase awareness of basic
art elements and principles AC, AP, Std. 1 & 3
2. Increase understanding and appreciation for the ways artists manipulate
elements and principles in aesthetic expression AH, AC, AE, Std. 3,
A/C
3. Develop understanding of line and shape qualities/characteristics AC,
AP,
Std. 2 & 3
4. Develop understanding of principles of overlapping, negative space and
composition AC, AP, Std. 1 & 3, A/C, M/P
5. Increase memory recall A/C
6. Increase attending skills and time on task behaviors AP, Std.1,
S, E, PreV.
7. Increase descriptive language skills AC, Std. 3, A/C, C
8. Develop sense of competence through mastery of concepts, tools and processes
AP, Std. 1 & 2, E, Pre/V
Performance Objectives for Observational Assessment (reflecting goals):
The students will be able to:
Opening:
- Recall the Three As and Three Cs Goals 5, 8
- Name at least one artmaker behavior Goals 5, 8
- Name the 4 basic elements of art (line, shape, color texture) Goal 1
- Name/describe at least three qualities of the element of line Goals 1, 3
- Identify/describe at least two
examples of an artist’s use of line in exemplar
Goals 1, 2, 7 - Participate in exercises with sustained attention and without disruption Goal 6
- Define terms overlapping and negative space Goals 4, 7
Middle:
- Follow directions of S/Ts without disruption Goal 6
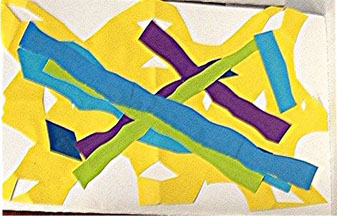
- Create a line collage by (product
criteria included):
- Use scissors to cut a selection of lines from colored paper
- Cut a minimum of 3 different kinds of lines
- Spend time arranging lines on background paper before gluing, demonstrating artistic behaviors when encouraged (e.g., look at composition from all angles before deciding to add final lines)
- Demonstrate overlapping of minimum of 4 lines in design
- Use glue stick appropriately to adhere lines to paper
- Use at least two different colors and two different kinds of lines in entire composition
- Use at least 8 lines overall in design
- Goals 1, 2, 3, 4, 6, 8
- Assist with clean-up as directed Goal 8
Closing:
- Hang finished designs on board as directed
- Recall the 4 basic elements of art
- Name/describe at least one thing about the use of line in own and in someone else’s design
- Indicate where overlapping has taken place in any design
- Describe/indicate negative space in any design
- Name at least one artmaker behavior used today
Tools Needed For Application
Vocabulary (defined in age-appropriate, student-friendly terms):
- Negative Space:
the space that is empty; also, the empty space/shape created from a cutout
shape
- Overlapping: when a line or shape is placed over or under a part of another line or shape
Visuals:
- Teacher-made:
elements of art chart; teacher product of line design
- Art Resources:
selection of artworks emphasizing line and its qualities such as work by
Matisse, Picasso (earlier work); examples of Anasazi pottery, African textiles
such as mudcloth or adire eleko; an actual leaf for each child (if available)
Materials and Preparation:
- Items for elements exercises: 12” chenille stems in assorted colors, styrofoam block, pre-cut lines in 8 folders for overlapping/composition exercise, mattboard shape for each child to feel
- Gather a leaf for each child if possible (or other suitable natural object)
- Black construction paper sheets for each student (app. 12x14inches)
- Scissors
- Pencils (in case students can’t cut right into paper without a visual reference)
- Assorted color sheets of construction paper (no larger than 4x14inches)
- Glue sticks
- Masking tape
- Black marker and portable display board
- Scrap paper and damp sponges
Application
Procedural Steps: (details on procedures from beginning to end with ability-appropriate language scripted in as necessary)
Adaptations: Use adapted scissors and/or pre-cut lines to select from for those students with poor fine motor control. Adaptations to presentation of conceptual material are described throughout the lesson (hands-on, actual concrete experience with the concept being taught).
Note: Not all of the preliminary opening activities described below can be accomplished in one session, but they are described here for teachers to choose from as they see fit. The entire lesson can consist of these exercises, or a few can be used that lead up to the art production piece, which is described.
Opening:
1. Lead teacher opens session with
Hello Song, and has children recall of The Three A’s and Three C’s
as the foundation for what we do in Art Partners.
2. Teacher asks children to recall/describe at least one artmaker behavior.
3. Using chart as reference, teacher presents the 4 basic elements of art:
line, shape, color, texture, explaining that these are the things that all
artmakers need to know about in order to make artworks.
4. Teacher explains that just like we need to know about the language we speak,
we need to know about the visual language we use to make art. (How much teacher
goes into following is based on students’ level of understanding and
attention.)
5. What do we need to know about in order to make spoken and written language?
6. Letters/alphabet, words, sentences, paragraphs, etc. If we wanted to write
a story we would need to know about and use these elements to make the story.
8. Teacher asks students to name the 4 art elements again, and uses chart
for help.
9. Teacher distributes the leaves or other natural objects, asking children
to find the lines, and moving into the idea that the elements of art are in
every object of our environment.
10. Teacher has children spend a few minutes looking for the elements in their
actual surroundings: don’t forget to look at yourself to finds lines
and shapes and colors and textures!
11. Teacher suggests that today we focus on the element of line, teaching
students four basic qualities of line using the portable display board and
marker, and involving them in the process:
12. Who can come up and draw a line, any kind of a line? (name it) Who can
draw a different kind of a line? (name it). We have just learned the first
quality of lines: there are different kinds of line.
13.
Teacher draws a straight, horizontal line. Who can tell me what direction
this line is going in? (teach term horizontal and define: lines that go across
or from side to side). Who can draw a line going in a different direction?
Repeat process for vertical (lines that go up and down), and diagonal (lines
that are slanted, go from corner to corner). We have just learned a second
quality of lines: lines can move, and go in different directions.
14. Teacher draws an emotive line, asking children to describe how that line
feels, or how it makes them feel. Draw other examples, and ask children to
come and draw an “angry” line, a “quiet” line, a “sad”
line, an “excited” line, etc. We have just learned a third quality
of lines: lines can show an emotion/a feeling.
15. Teachers explains one more quality of line by drawing one line, then another
that touches, then another, and finally connecting to make a shape, asking
children to name what the lines have created. We have just learned the fourth
quality of lines: they close up space/connect/ overlap to make shapes.
16. Teacher suggests that we test our knowledge of lines, handing each child
a chenille “line”, asking them to note what kind of line it is,
and what direction it’s going in according to how it’s being held.
17.
Teachers ask the children to change their lines (by bending, twisting, etc.);
describe them, then change again. Finally, change one last time. Teacher suggests
that we use all of our lines to make a group sculpture, passing the styrofoam
block around for each child to add their line. As this process occurs, teacher
reminds children to make good artistic decisions by looking at this sculpture
from all sides, noting where it needs another line, what/where is the best
way to place it, should it overlap with another’s line, etc.
18. To further extend our knowledge of line, teacher then asks students to
see if they can find/discuss lines in the exemplary artworks, find where the
artists has used different kinds of lines, used “moving” lines
going in different directions, used line to show a feeling, made shapes out
of lines.
19. Teacher then introduces the principles of art, explaining that these are
what we do with the elements to make good designs. Today, we will learn about
two of these principles: overlapping and repetition. Teacher defines terms
and demonstrates on display board or blackboard (In the Art Partners program
we are not always in a classroom, and have to improvise some equipment).
20. To experience overlapping and negative space, S/Ts distribute some pre-cut
paper lines from their folders, and have the children actually manipulate
them right on the folder to show overlapping, noting the shapes that occur
in the negative space. S/T’s reiterate the need for aesthetic decision
making, as children experiment with making a pleasing composition (how would
it look if we overlapped…, what if you repeated that line here….notice
the negative space…).
21.
Teacher presents idea of using the element of line to make our own designs
on paper, and displays the teacher exemplar…we can make different kinds
of lines of different colors, make them go in different directions, make them
overlap to create shapes, etc. Teacher defines the format we will use: collage.
22. Teacher stresses using our “artmaker’s eye” to help
us see if our designs are looking good, and to see what they might need to
make them look better, reinforcing that: we need to think like artists and
see like artists and behave like artists.
23. Processes are demonstrated and students are told that they must first
arrange their lines and experiment like artists BEFORE they start any gluing.
Students go to their smaller groups with their S/Ts to make their line collages.
Middle:
24. S/Ts distribute assorted colored
paper and have students begin to cut different kinds of lines, helping them
to vary their lines…zigzag, curvy, straight. S/Ts may need to show and
explain how to turn the paper as you cut to make the line “move”
(not be straight). S/T’s will also need to demonstrate how to create
the thickness of the line by repeating the same cutting pattern some distance
from the first cut. Students should cut out at least 8 lines altogether, with
at least 3 different kinds.
25. ADAPTATIONS: allow students to use pencil to draw their lines first if
easier, being sure there is some thickness to the line; for any student who
can’t cut, have them draw line on paper and S/T’s can cut, making
line at last ½” thick; For students who can’t draw, allow
them to select from assorted pre-cut lines
26. Once lines are cut, S/Ts help students to experiment with arrangement
and good composition, encouraging the use of overlapping, and the use of artist
behaviors as described above.
27. Once desired arrangement is
achieved, students can use glue sticks to adhere lines to black background
paper. S/Ts may need to show how to use glue stick: try not to press to hard
and smoosh the tip: lay cut paper line on scrap paper to apply glue; wipe
sticky fingers on damp sponge if necessary; lower tip of glue stick before
capping!
28. Finished line designs are displayed in front, as students help hang their
collages and assist with clean up as directed by S/Ts.
Closing:
29. All reconvene in larger group
as lead teacher has students recall major concepts: elements and principles
of art, line qualities.
30. Teacher has students explore their designs and describe/indicate negative
space, and where the artist used overlapping, what happened when overlapping
of lines occurred, etc.
31. Teacher encourages students to describe a way in which they acted like
an artist/artmaker today. What artmaker behavior did you use today?
32. Teacher offers a preview of next lesson in unit, and a reminder to students
to look for lines, and the other elements, all around them as they go home
on the bus today. All sing Goodbye Song.
Assessment:
In addition to observation of the Performance Objectives described above for evaluating students, as well as noting what teachers may need to re-teach or do differently, questions to ask might include:
- Did students respond with pleasure and engagement in the activities?
- Was time on task sustained at least 80% of the time?
- How does the product go beyond the minimum criteria stated above?
- How did they show artmaker behaviors?
Abbreviation Key
DBAE: |
NYS Standards for the Arts: |
|---|---|
| AH = Art History | Std. 1 = creating, participating in art |
| AC = Art Criticism | Std. 2 = knowing art materials and processes |
| AE = Aesthetics | Std. 3 = responding to works of art/artists |
| AP = Art Production | Std. 4 = knowing cultural dimensions of art |
| Needs Assessment Areas for Developing Skills and Abilities: |
||
|---|---|---|
| A/C = academic/cognitive | M/P = motor/perceptual | E = emotional |
| C = communicative status | W/S = work/study habits | S = social |
| Pre-V = prevocational skills | L = living skills |
|
This is a non-commercial website and is to be used for educational or research purposes only. No commercial use is permitted without the consent of Art Partners. "Fair use" is claimed under U.S. copyright law, sections 107 and 108. For questions contact:Art Partners
©2002 Art Partners Program | All Rights Reserved